|
vDash Specifications |
Virtual Dashboard Utility for PC |
click on Image Hotspots (above) to learn more
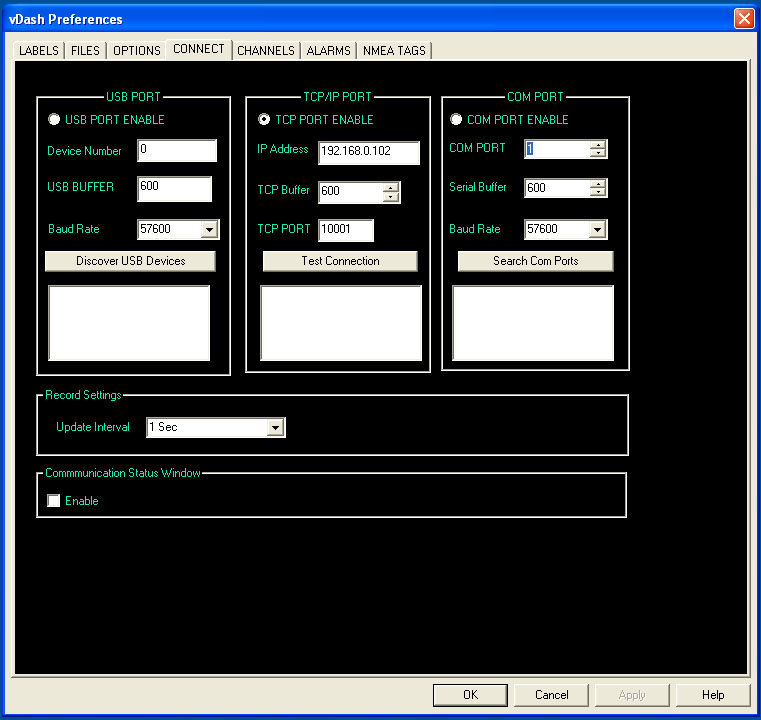
vDash can accept data from a variety of interfaces including USB, Ethernet, Wi-Fi, Bluetooth, and Serial. The CONNECT panel allows selection of input choice and setup of connection parameters.
The Most common method of connection is a Serial or Virtual
Serial port. Most USB adapters and Bluetooth adapters use a
Use this connection method if connecting by a USB to SERIAL or USB to USB adapter supplied only by Chetco Digital Instruments. Not all USB adapters are the same and those supplied by other vendors may not work with this option.
A USB to SERIAL adapter (part #VGUSBS002) will be required to connect a
A USB to USB (part #VGUSBU001) adapter will be required to connect a Master USB port (USB1) on a vGauge-Remote unit to a PC USB port. The adapter has 2 type A male USB ends with an interface module in the middle
vGauge Display Heads supplied with a direct USB cable do not require an adapter and can be plugged directly into Host PC USB ports
 Once
the adapters are plugged into the Host PC and device drivers loaded, this
option panel can be used to configure settings and verify operation.
Once
the adapters are plugged into the Host PC and device drivers loaded, this
option panel can be used to configure settings and verify operation.
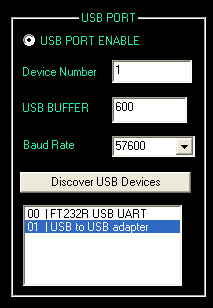 Discover USB Devices – Press
this button to search Host PC for properly attached USB devices which are
compatible with vDash protocols.
Discover USB Devices – Press
this button to search Host PC for properly attached USB devices which are
compatible with vDash protocols.
Once the search is complete, a list of supported devices will be displayed. In most cases, only one device will be shown. In the case of multiple devices, click on the appropriate item.
Device Number – Should be 0 for a single device otherwise will reflect the device number of the selected interface
USB Buffer – Can be adjusted down to decrease latency but should default to 600 for best performance.
Baud Rate – Set to match rate programmed into vGauge Unit – Default is 57600.
Use this option if connecting via Ethernet or WI-FI interface utilizing TCP/IP protocols. A Ethernet adapter (part #VGENETC001) or WI-FI adapter (part #VGENETW001) will need to be attached to vGauge-Remote unit and configured with proper IP address as covered in the adapter installation manual. Once configured, communication with a vGauge-Remote sensor unit is possible over most Internet connections.

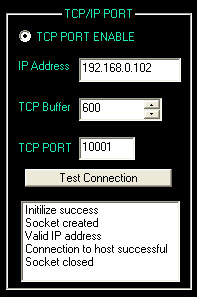 Test TCP/IP connection – Performs a communication
test using the supplied IP address and TCP port number.
Test TCP/IP connection – Performs a communication
test using the supplied IP address and TCP port number.
IP Address – Enter IP address obtained from adapter setup and configuration. This is usually a DHCP assigned local address and can often change when new devices are added.
TCP Buffer – Can be adjusted down to decrease latency but should remain at 600 for best performance
Use this option for connecting via physical serial (COM)
ports and non-standard devices such as Bluetooth and third-party USB to Serial
adapters which use

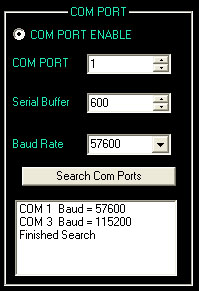 SEARCH
Serial Buffer – Can be adjusted down to decrease latency but should be set to 600 for best performance
Baud Rate – Select the appropriate Baud rate to match the attached vGauge unit. Most VCP drivers will automatically adjust to the chosen rate. The common rate is 57600
To perform a firmware
update – you must connect to the unit with the
The capture rate for data logging is specified with the Update Interval Drop-Down menu.
vDash will wait the specified amount (1 second to 5 minutes) before writing a new buffer of sensor data to the Log file. When set to “Fastest”, vDash will capture data as fast as it arrives without waiting.
Log file playback is also controlled by the Update Interval setting.
A status window can be enabled to show RAW data arriving from a connected vGauge-Remote unit in the main display window. This can be useful in diagnosing any communication problems with the unit. It should remain disabled (unchecked) when not needed for best performance.
info demo specs prices products order support contact
(c) Copyright 2008 Chetco Digital